Our second match of the season was a home match against South Bristol A on 10th October. Due to the strength of the opposing team, winning the match seemed unlikely from the get-go, but we planned to put up a fight and hope for the best. Apart from me and Finn, our team consisted of players who hadn’t played in the league before: Dimitar, Shubham, Jack, and Ismail. Therefore, I was curious how everyone would fare, especially against such a strong team.
There was a significant concern behind-the-scenes until mere hours before the match that we wouldn’t have a room in which to play it. When the A and C Teams had their first home matches of the season, they were unable to access the rooms that they thought we had booked so they had to use another vacant room and hope it wasn’t booked by a group who needed it. After urgently meeting with the Student Union, they kindly booked me two further rooms as backups for the match, confirmed the exact numbers of the rooms we had booked, and gave me directions to the rooms. With that information, I located the rooms we had booked and was able to access them perfectly fine. There must have been some confusion about which rooms we had booked. The important thing is that we had a room in which to play the match. Thank you to Thomas, Ismail, and the Student Union staff for helping to ensure that we had a room.
With the room booking issue resolved, the rest of the match setup went relatively smoothly, so I’ll cover the games in the approximate order that they finished.
Board 2
I had White on Board 2 and, despite my game being the first to finish, it still lasted more than 7 times longer than Samson’s game in the previous match. The game started as an Alapin Sicilian with 2… e6 and, even though I was in preparation until move 10, when I had to start coming up with my own ideas, I quickly realised that my position was actually somewhat perilous. I always try to get into tactical positions, but my opponent had all the tactical ideas, including potential sacrifices on g3, g4, and h3 and a Greek gift threat. Consequently, I switched my focus to ensuring that my opponent wouldn’t win a tactical miniature.
As is typical, by defending against my opponent’s kingside attack, I completely forgot that I told myself a few moves prior to always check that a5 wasn’t a threat. After 14. Qf3, which aimed to save me the trauma of losing to a bishop sacrifice on h3, Black is better because of 14… a5. White can’t play 15. a3 because of 15… axb4 16. cxb4 Bxb4, where taking the bishop hangs the rook on a1, so White has to play 15. bxa5 and heavily weaken the queenside, or sacrifice the b-pawn altogether. Instead, my opponent played 14… Qc7 to prevent Bf4, missing the opportunity to be better. We both then completed our development, although my bishop had to awkwardly go to b2, and the game switched to the queenside. After 19… a6, I correctly acknowledged that c5 was a threat because b5 was no longer available to my knight, but I reacted incorrectly with 20. b5, intending to either trade everything on b5 or to relocate the knight on d4 to c6 instead in the event of c5.
This allowed Black another opportunity to be objectively better with 20… Rxe2 21. Rxe2 Rxe2 22. Qxe2 c5 23. Nc6 c4, but, apart from the bishop still being stuck on b2, this looks better for White if anything. Instead, my opponent played the more natural 20… axb5, at which point, seeing no realistic winning chances, I started trading everything with 21. axb5 cxb5 22. Nxb5 Qb6 23. Nxd6 Qxd6 24. Rxe7 Rxe7 25. Rxe7 Qxe7 26. Qe3 Qxe3 27. fxe3, leaving a knight and 4 pawns each and opposite-coloured bishops. While trading the queens left my c- and e-pawns isolated, this was inconsequential because my bishop was the same colour as the squares on which the pawns were.
I offered a draw after 30… Kd7, which was accepted after I rerouted my bishop to d4, because my pieces were already perfectly positioned to deprive my opponent of any winning chances. My opponent apparently played at 96% accuracy and was 244 points higher rated than me so drawing was definitely a good result, and for the team it was a promising start, but I am getting a bit of a drawish reputation. This wasn’t a short game but somehow everyone else’s games took longer, so I got to sit back and watch the rest of the games conclude.
Board 6
Ismail had White on Board 6 and his game started with the Grand Prix Attack in the Sicilian. We were hoping his opponent would play 1… e5 so he could play the King’s Gambit, because I know from experience how stressful it is to play against Ismail’s King’s Gambit, but sadly not this time. Ismail left his preparation on move 5 after his opponent’s inaccurate 5… a6 and the position got complicated quickly, with both players having an objective advantage at a couple of points in the early middlegame. Having played dozens of blitz and rapid games with Ismail, calling his playstyle aggressive would be quite the understatement, and, sure enough, he found a way to launch a powerful kingside attack by opening up the f-file and aiming almost every piece at the kingside.
Black was able to keep their kingside relatively well-defended, however, and there was no clear plan of attack in the above position, so Ismail’s opponent started to put him on the back foot, although Ismail briefly regained his advantage. With most of the pieces still on the board and active, the engine wasn’t exactly loving this game, but it was very hard for a human to evaluate. On move 34, Ismail was able to triple his major pieces on the f-file with 34. Rf4, but Black found the temporary exchange sacrifice 34… Rxc4.
This forced a mass trade with 35. dxc4 Qxd6 36. Rxf6 Bxf6 37. Qxf6 Qxf6 38. Rxf6, and when the dust settled, both players had a rook and 6 pawns, although the pawn structure was very imbalanced. Ismail created a passed a-pawn while Black infiltrated on the 2nd rank, and it appeared that Black’s passed d-pawn would be unable to make much progress. Black offered a draw but Ismail believed he had winning chances and I know he doesn’t like draws in general, so he declined, responding with “LOL, no.” You can probably see where this is going. Ismail played 41. b4 to try to win the passed d-pawn at the cost of a pawn that was doomed to the rook anyway.
However, after 41… cxb4 42. Rxd4, the b-pawn is of course passed instead of the deceased d-pawn, and 42… b3 won on the spot for Black because the White rook cannot get behind the b-pawn to stop it, due to the c-pawn being in the way, and the king is cut off on the first rank. Frankly, the White pieces couldn’t be any more unfortunately positioned, but you may have noticed that 42… b3 was not in bold, and that is because Black played 42… Ra2 instead, returning the game to a drawn endgame. Don’t breathe yet though, because after 43. Rd3 Rxa4 44. Rb3, Black was winning yet again with 44… Kf8, and you will definitely have noticed that that is in bold. Black’s king got active quickly but Ismail’s king had a long walk if it wanted to stop the b-pawn, and it did not make it in time, eventually forcing him to resign. On the bright side, at least Ismail didn’t have to agree to a draw, and it was interesting to see that his aggressive style in blitz and rapid definitely translates into classical too.
Board 1
Finn had Black on Board 1 and his game started with the Old Sicilian Variation. White immediately opted for a rare kingside fianchetto setup with 3. g3 and Finn followed suit with 4… g6. The position remained closed throughout the middlegame because White opted for the relatively passive 5. d3, so there was a lot of manoeuvring. Finn took space on the queenside with 10… b5 and 16… a5 and, as Black’s pieces swarmed more around the centre, Finn was able to take even more space with 19… b4 and 20… a4. He then briefly switched to the kingside with 23… h5, but returned to the queenside to complete his pawn chain with 25… a3.
While pawn art doesn’t necessarily help when it comes to winning the game, Finn was able to achieve the most aesthetically pleasing pawn chain I’ve ever seen in a serious game, which he described as a Nike tick. Getting 5 connected pawns on the same diagonal is challenging enough as it is, and by move 25, you’d certainly expect at least one trade of pawns. Having well and truly won artistically, Finn had to try to win positionally. However, White’s kingside pressure mounted and Finn was objectively losing after 28… f5. White continued their attack, tragically destroying the Nike tick, and found the excellent pawn sacrifice 33. Qf7+.
After 33… Qxf7 34. exf7+ Kxf7 35. Bd5+, Black loses at best a knight, so Finn correctly played 33… Kh7. Not seeing a knockout, White decided to invest in the passed e-pawn with 34. Qxe7 Rxe7 35. Bd5, but this lost a lot of the advantage. In fact, the position became objectively equal after 39. Ref1, despite doubling the rooks on the only open file being very natural. In response to 39… Rf8, White opted for 40. Rf7+, forcing Black to allow the passed e-pawn to make it to f7.
Now, the question is: with which rook should you take? There is of course no difference if 41. Rxf7+ is played in response, but if 41. exf7 is played instead, do you want the remaining rook to be on f8 or e7? The answer is that you want the rook to be on e7 so that Re2+ is an idea. In fact, 40… Rfxf7 41. exf7 Re2+ is winning for Black after 42. Kh3 and the only move 42… Nf8, because the pawn on a3 is already very far advanced and the a2 pawn is exceptionally weak. However, in the game, Finn played 40… Rexf7, giving White a significant advantage. If 41. Rxf7+ Rxf7 42. exf7, White is up a pawn but has no way to break through, whereas 41. exf7, which White played, confines Black’s rook to the 8th rank and White has all the activity. It is brutal that such a nuance can be so important. After 41… Nf6 42. Be6, objectively Finn’s best chance to survive was 42… Ng4+ 43. Bxg4 hxg4 44. Kg2 d5 45. cxd5 Rxf7 46. Rf4, which is still basically winning for Black but that line is basically impossible to find for a human anyway. Ultimately, Finn sacrificed the exchange for a pawn and activity but White eventually broke through and Finn resigned in a losing king and pawn endgame. Like Ismail, Finn nearly got a draw but lost by the smallest of margins, but, in a way, that Nike tick pawn chain was better than a win.
Board 4
Shubham had White on Board 4 and his game started with the Bowdler Attack (2. Bc4) in the Sicilian. Yes, that is the fourth consecutive Sicilian, but I played 2. c3, Ismail played 2. Nc3, Finn’s opponent played 2. Nf3, and Shubham played 2. Bc4, so, by pure coincidence, we miraculously all had a different 2nd move in our games. The most principled approach against the Bowdler Attack is definitely 2… e6 to blunt the bishop’s diagonal and to follow that up with 3… d5, but Black opted for a more standard Sicilian setup with 2… Nc6 instead. Shubham then opted for a setup with an early queen and bishop battery against f7, but Black prevented all counterplay against f7 with 5… e6, at which point Black is a bit better. The most natural responses for White are probably 6. d3 and 6. d4, which would likely both lead to sacrificing the e4 pawn for initiative. With a similar idea, Shubham played 6. e5, sacrificing the e-pawn to damage Black’s central pawn structure.
Notably, 6… d5 doesn’t give Black any advantage because 7. exf6 dxc4 8. fxg7 leaves the White queen hanging but threatens to promote to a new one by taking the rook on h8, so 8… Bxg7 9. Qxc4 leaves Black down a pawn. However, Black is a lot better after 6… dxe5. Shubham then played 7. Bb5 to threaten 8. Nxe5 because the knight is pinned, but Black can shut this idea down tactically with 7… Qc7 because of 8. Bxc6 Qxc6 9. Nxe5 Qe4+, winning the knight on e5. In the game, however, Black played 7… Bd6 to defend the e-pawn, but this loses the majority of the advantage because it permits White to double the c-pawns with 8. Bxc6 bxc6, which is of course in addition to the already-doubled e-pawns. Both players continued their development until Black posed the question of where White should put the bishop with 10… h6.
The best move in the above position is in fact to trade bishop for knight with 11. Bxf6, with the idea that after 11… Qxf6 12. Nbd2, White is threatening to get the bishop on d6 with 12… Ne4, which would leave Black’s c5 and e5 pawns very weak. In the game, however, Shubham played the very natural 11. Bh4. Black soon came up with an excellent way to exploit the placement of the bishop with 13… f5, threatening to trap it with g5 and f4. As a result, the position was very difficult for White to play when Shubham played 15. Qe2, which applies pressure to e5 and creatively lessens the threat of g5.
Unfortunately, this loses to 15… Nf4, which was played in the game, attacking the queen and the pawn on g2. Funnily enough, if Black had trapped and taken the bishop with 15… g5 16. Bg3 f4 17. 0-0-0 fxg3 18. hxg3, the position is objectively equal, despite the fact that White is down a piece, because of the pressure down the h-file. After 15… Nf4, however, Black quickly crashed through with the further-advanced e-pawn, winning a piece and a pawn, and converted in a manner that never allowed Shubham any hope of coming back, so he eventually resigned. With that, we can finally bid farewell to the Sicilian.
Board 5
Jack had Black on Board 5 and his game started with the Panov Attack in the Exchange Caro-Kann. Firstly, thank you to Jack for reminding us that 1… c5 isn’t forced after 1. e4. I assume he didn’t pick up the c-pawn and accidentally drop it on c6. As White expanded on the queenside out of the opening, with the inaccurate but very logical 12. b4, they briefly allowed Jack an opportunity to equalise.
The move that equalises is 12… bxc5, with the idea to undermine the defence of the knight on e5. After 13. bxc5, it is very natural to calculate 13… Bxc5, because of course 14. dxc5 Qxe5 wins at least a piece for Black, but White appears to simply have 14. Nxc6, basically winning a piece. However, Black has the easy-to-miss 14… Bd6 in response, since, if the knight on c6 moves, the knight on c3 hangs. It doesn’t even end there because Black has to find two more only moves with 15. Qa4 Nd7 16. Rb1 Rc8, at which point the position is equal. Neither player can be faulted for missing all of that. In the game, Jack played the logical 12… Nd7 instead. A few moves later, Jack played 16… b5, which gave White an objectively winning advantage because of the pressure that White can exert on the b5 pawn, and of course 2 connected passed pawns would be unstoppable.
Apparently, Jack had to play 16… bxc5, but after 17. bxc5, Black’s position feels too passive because you cannot put a rook on the open b-file because of the bishop on f4, and after 17. dxc5, Black has to come up with the idea of 17… a5 to undermine the base of the pawn chain, and that still gives White a passed b-pawn, so it’s really unclear that this is the way to go. Following 17. axb5 axb5 18. Qd3 Rxa1 19. Rxa1, Jack immediately created counterplay with 19… Ra8, threatening various back-rank mating ideas, but his opponent steadied the ship and managed to pick up the b5 pawn. White’s two passed pawns stormed up the board, but Jack was able to eliminate both of them at the cost of his knight, leaving him down a minor piece. White then forced a queen trade, planning to simply grind out the endgame with their extra knight.
Jack’s d-pawn was passed, but it wasn’t very far advanced, having not moved since move 2, and it was perhaps more of a weakness than a strength. White was very careful not to allow Jack any chance to eliminate all 3 pawns, but he got very active and won one of them back. Ultimately, the White h-pawn became passed and the knight was able to stop Jack’s d-pawn, so he resigned. Considering this was Jack’s first game in the league, however, this was an excellent performance, only really making one mistake and posing problems for his opponent right until the end.
Board 3
Dimitar had Black on Board 3 and his game also started with the Exchange Caro-Kann. I was not privy to any cross-team agreement that every game would start 1. e4 c-something, so this whole thing was just a crazy coincidence. Let’s just be grateful that this is the 2nd Caro-Kann and not the 5th Sicilian. Out of the opening, White was able to establish a strong knight on e5 and take a lot of space, which forced Dimitar to play relatively passively. On move 14, White missed a tactic that won a pawn, but still enjoyed a comfortable edge until 16. Bb1, a move that I simply do not understand. This allowed Dimitar to trade off White’s strong light-squared bishop, and while this objectively equalised the position, pressure accumulated on the g7 pawn with White’s rook lift 20… Rf3 and 21… Rg3, so the position was certainly not without danger. White’s queen soon also joined the attack with 23. Qh5, creating a tactically rich position. Dimitar responded with 23… Qxb2, which allowed a difficult-to-spot winning tactic for White.
The only winning line is 24. Bxg7 Rxg7 25. Qxh6 Rxg3 26. Qxe6+ Kh8 27. hxg3, at which point Black’s position collapses, but this was understandably missed. Instead, White played 24. Qxh6, and after 24… Nxe5 25. Rxe5 Qc1+ 26. Kf2, the engine has the gall to say that the position is equal, but practically speaking, it is anything but equal, as the e6 pawn appears to be doomed and there is no perpetual. Dimitar created counterplay against White’s king with 26… Rxc3, but this allowed another crazy sacrifice on g7 that was missed.
After 27. Rxg7+ Rxg7 28. Qxe6+, it is not at all obvious because there are so many different variations to calculate but there is mate in 6. The fastest mate after 28… Rf7 is interesting because the queen keeps giving checks to move the king to the correct square and then checkmates when it returns to e6. That line is 29. Qg6+ Kf8 30. Qh6+ Rg7 31. Qh8+ Kf7 32. Qe8+ Kf6 33. Qe6#. None of this happened in the game of course because White played 27. Qxe6 instead, which makes a lot of sense because it looks like the queen and rook battery will be able to block any attack on the king, and it creates the threat of 28. Qe8+ Rf8 29. Rxg7+ Kxg7 30. Re7+, which is mating. However, White is objectively losing here after 27… Qxf4+, which Dimitar played, and he soon picked up the d4 pawn too, but in the ensuing time scramble, tragedy struck after 35. Rc8+.
In the above position, Dimitar had to play 35… Rf8, which leads to a draw with perfect play, although Black is definitely the one playing for a win despite the d5 pawn falling with check. However, in acute time pressure, Dimitar played 35… Kh7, which loses a rook after 36. Qh5+ Qh6 37. Qxf7. While White proceeded to twice blunder a perpetual, both lines were tricky to find with barely any time on the clock, so Dimitar eventually got triangle mated. Despite this being Dimitar’s first ever classical game, he nearly beat someone rated almost 2000, so I’m confident he’ll bounce back immediately. I have a negative score against him in blitz so he’ll likely be moving up boards very soon too.
Summary
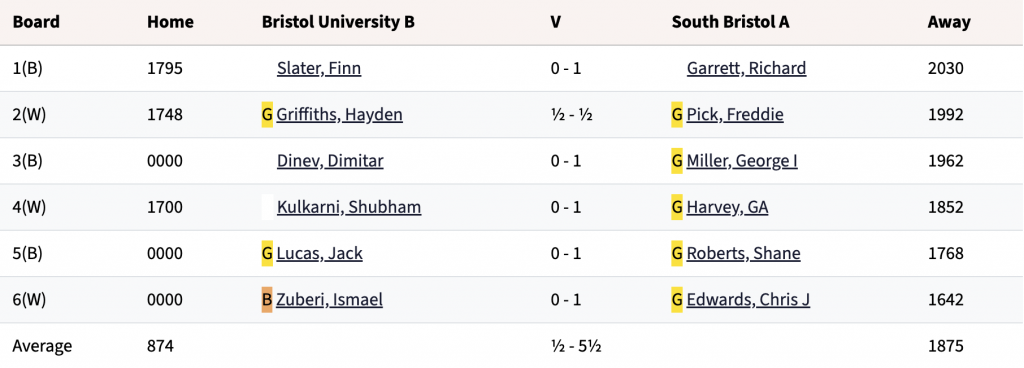
Considering the strength of the opposing team, losing the match was somewhat inevitable, but I at least managed to get us on the scoreboard, so hopefully we won’t lose 0-6 at any point this year, unlike last year in Division 1. Finn, Dimitar, and Ismail were all close to at least a draw until their respective time scrambles, so we certainly did better than the final score of 0.5-5.5 suggests. As I said, 4 of our players hadn’t played classical in the league before, if any classical at all, so I would say we performed relatively well under the circumstances. We got lucky in the previous match so it’s fair that we got unlucky in this one. Fortunately, most of the other teams aren’t quite as strong, so we should have some good chances to win more matches. Our next match is a home match against Downend & Fishponds C on 24th October, so the next match report will be posted soon after that.